This was a sculpt mode merge problem: the G_DRAWSHARP and G_SCULPTMODE flags
had the same value, so Blender thought it was in sculpt mode when "Draw Sharp"
was turned on, leading to segfaults.

I have moved the G_SCULPTMODE flag to an unused value.
This patch adds a new option to the separate menu in editmode, 'By Material'.
It simply loops through all materials in the mesh selects the faces associated
with them and calls separate().

Thanks to Andrea Weikert for the patch!
Four more selection options in Curve editing;
- select more/less (ctrl+numpadplus/minus)
- select first/last point

All nice in menus and toolbox even!

Patch note: had to fix bugs in using 'continue' inside of while() loops.
Turned all oldstyle while() in for() for going over lists.
NLA window now follows visibility for scene layers, cleaning up complex
files quite some. Only note we could make is if this could be optional,
sometimes it's also nice to see the entire scene.

Note for Roland: this is a recoded version, with about 10% of code :)
#4742 exported normals are now correct
  #4821 & 4956 for complex movements in/outflows can now also
  use the animated mesh option
- new features
  * isosurface subdivision: directly
    creates a finer surface mesh from the simulation data.
    this increases simulation time and harddisk usage, though, so
    be careful - usually values of 2-4 should be enough.
  * fluidsim particles: extended model for particle
    simulation and generation. When isosurface subdivision is enabled,
    the particles are now included in the surface generation,
    giving a better impression of a single connected surface.
    Note - the particles are only included in the final surface
    mesh, so the preview surface shows none of the particle
    effects.
  * particle loading: different types of particles can now be selected for
    display: drops, floats and tracers. This is a bit obsolete
    due to the extensions mentioned above, but might still be useful.
    Floats are just particles floating on the fluid surface, could
    be used for e.g. foam.
  * moving objects impact factor: this is another tweaking option,
    as the handling of moving objects is still not conserving
    mass. setting this to zero simply deletes the fluid, 1 is
    the default, while larger values cause a stronger
    impact. For tweaking the simulation: if fluid disappears, try
    increasing this value, and if too much is appearing reduce it.
    You can even use negative values for some strange results :)
- more code cleanup, e.g. removed config file writing in fluidsim.c,
  added additional safety checks for particles & fluidsim domains (these
  currently dont work together). I also removed the "build particles"
  debug message in effects.c (seemed to be unnecessary?).

Some more info on the new features:
Here are two test animations showing the difference between
using the particle generation with isosurface subdivision.
This is how it would look with the old solver version:
http://www10.informatik.uni-erlangen.de/~sinithue/blender/fluid6_fl6manc4_1noparts.mpg
and this with the new one:
http://www10.informatik.uni-erlangen.de/~sinithue/blender/fluid6_fl6manc4_2wparts.mpg
Both simulations use a resolution of 64, however, the version with particles
takes significantly longer (almost twice as long).
The .blend file for a similar setup can be found here:
http://www10.informatik.uni-erlangen.de/~sinithue/blender/fluid6_testmanc4.blend
(Minor Tips for this file: dont enable subdivions of characters until rendering,
thus leave off for simulation, as it uses the rendering settings! For making
nice pictures switch on subdivion, and OSA.)

And here's a picture of old vs. new (for webpage or so):
http://www10.informatik.uni-erlangen.de/~sinithue/blender/fluid6_manc4compare.png
VertexPaint mode didn't show interpolated (smooth) colors in faces.
Error caused by Modifier & DerivedMesh commit of august 22. Rules for
drawing smooth changed a bit...
Copy modifiers menu should be available for Lattice and Surface objects.

Note it does not support copying between different object types, that
is being indicated with a notice popup now.

I rather not code copying to other object types for now, this is something
which fits better in the modifiers API first. Right now the buttons code
handles this.
Nkey panel for creases median didn't work properly. Now it does as follows:
- if set to 0 or 1 it applies that value to all creases
- else it adds the diffference of median crease value and the button value

Bugfix #5122

Paths drawing option for Poses now uses entire startframe-endframe range.
Before it skipped the last frame for drawing.
Deleting all points in a Curve object created empty DispList blocks. The
drawing code didn't like that.
Secured it by both fixing drawing as skipping adding empty DispLists.

Special thanks to Fernando Bastos for the extensive stack tracing.
Added undo push after "create UV grid image".
Note that it won't help much, since the Imbuf is freed on undo... that's
for another project, to have a fixed Image cache to use in Blender.
With the addition of vertexgroup support for Lattices, the option
'create vertex groups from closest bone' crashed due to reading NULL.

Fix provided & tested by Joshua.
Dupli-group doesn't work yet for metaballs. Code entered an eternal loop,
because the group-duplication code calls again the metaball creation code.

Disabled this. MakeDisplist needs review!
- Removing Shape Keys didn't free drivers
- The sample file had Shapekeys in a weird order (should be sorted on shape
  index number). How this could have happened is unknown, probably a script.
  For the time being added a version patch to check on this after reading
  a file. If wrong ordered, it gives warning prints.
Using the Library Append "at cursor" option went wrong;
- it moved all selected objects to cursor position
- it didn't even check what was imported...

Both issues are fixed now.
* when an object had wire draw in Draw Extra enabled and
  it was selected and set as a scene, it would draw
  as selected. Changed so it draws the wires in a grey
  shade, to communicate it is not in the active scene
If you rename a Constraint, the used Constraint Channels (Ipo curves) were
not renamed as well, making animations not work anymore.

Now renaming works up to this level:
- own object constraints
- own object Action constraints

This is identical to Bone renaming. Note that other actions (like in NLA)
are not corrected for renaming. Have to look at ways to provide that once.
Apparently being so scroogish for cpu cycles makes crashes in Linux. I'll
add it on todo for later checks, but I need a windows or linux coder for
it!

For users: it might fix crashes when you have NodeTrees in Libraries.
- Removed obsolete IRIZ image support from menus.
  This was a Blender-only version of SGI Iris images, used internally in
  the nineties because it was the only format supporting Z easily
  A much better Z exporting - and industry compliant - is via OpenEXR

- Scene strips in Sequencer now get Z buffers as well. This is only in
  float format, containing actual distances from the camera.
The "Copy Size" constraint was calling a where_is_object(), this caused
the depsgraph to mess up in very weird ways and rare occasions. In the
sample file it showed strange lags in bones for using the "Stride bone"
option.

While trying to locate the bug I've revisited the Pose depsgraph in detail,
trying to figure out how it can print possible cycle errors in dependency.
That has been added now too (in console). Unfortunately the bugreport
example had no cycle errors. :)
Clear transform (ALT+G/R/S) in Pose sometimes didnt work, for example when
armature is being controlled by other armature. Caused by double depsgraph
flushing.
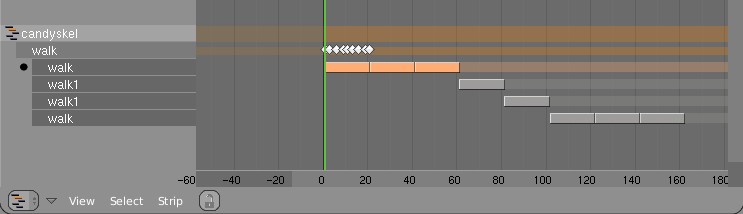
- FORWARD CYCLING & MATCHING

Up to no now, adding multiple actions in NLA with walkcycles required to
animate them standing still, as if walking on a conveyor belt. The stride
option then makes the object itself move forward, trying to keep the foot
stuck on the floor (with poor results!).
This option now allows to make walk cycles moving forward. By
indicating a reference Offset Bone, the NLA system will use that bone to
detect the correct offset for the Armature Pose to make it seamlessly going
forward.

Best of all, this option works as for cyclic Action Strips as well as for
individual Action Strips. Note that for individual strips, you have to set
the strip on "Hold". (Might become automatic detected later).

Here's an example edit image for NLA:
http://www.blender.org/bf/nla_match-cycle.jpg
And the animation for it:
http://download.blender.org/demo/test/2.43/0001_0150_match.avi
Blender file:
http://download.blender.org/demo/test/2.43/mancandy_matching.blend

Using this kind of cycling works pretty straightforward, and is a lot
easier to setup than Stride Bones.

To be further tested:
- Blending cycles
- matching rotation for the bones as well.

- ACTION MODIFIERS (motion deformors)

The above option was actually required for this feature. Typically walk
cycles are constructed with certain Bones to be the handles, controlling
for example the torso or feet.
An Action Modifier allows you to use a Curve Path to deform the motion of
these controlling bones. This uses the existing Curve Deformation option.
Modifiers can be added per Action Strip, each controlling a channel (bone)
by choice, and even allows to layer multiple modifiers on top of each other
(several paths deforming motion). This option is using the dependency graph,
so editing the Curve will give realtime changes in the Armature.

The previous walkcycle, controlled by two curves:
http://download.blender.org/demo/test/2.43/0001_0150_deform.avi
Blender file:
http://download.blender.org/demo/test/2.43/mancandy_actiondeform.blend

Action Modifiers can be added in the NLA Properties Panel. Per Modifier you
have to indicate the channel and a Curve Object. You can copy modifiers from
one strip to another using CTRL+C (only copies to active Object strips).

Setting up a correct Curve Path has to be carefully done:
- Use SHIFT+A "Curve Path" in top view, or ensure the path is not rotated.
- make sure the center point of the Curve Object is at the center of the
  Armature (or above)
- move the first point of the curve to the center point as well.
- check if the path starts from this first point, you can change it using
  (in Curve EditMode) the option Wkey -> "Switch Direction"
- Make sure alignment uses the correct axis; if the Armature walks into
  the negative Y direction, you have to set in Object Buttons, "Anim settings"
  Panel, the correct Track option. (Note; option will probably move to the
  Modifier later).

This is a good reason to make such paths automatic (on a command). Is on the
todo list.

Also note this:
- the Curve Path extends in beginning and ending, that's (for now) the default,
  and allows to use multiple paths. Make sure paths begin and end horizontal.
- Moving the Curve in Object Mode will change the "mapping" (as if the landscape
  a character walks over moves). Moving the Curve in Edit Mode will change the
  actual position of the deformation.
- Speed (Ipos) on paths is not supported yet, will be done.
- The Curve "Stretch" deform option doesn't work.
- Modifiers are executed *after* all actions in NLA are evaluated, there's no
  support yet for blending multiple strips with Modifiers.
- This doesn't work yet for time-mapping...

This commit is mostly for review by character animators... some details or
working methods might change.
This feature can also be used for other modifiers, such as noise (Perlin) or
the mythical "Oomph" (frequency control) and of course Python.

Special thanks to Bassam & Matt for research & design help. Have fun!
settings, rather than using the object's TrackX/Y/Z/etc buttons.

 This is good for two reasons: a) having the settings over in the object buttons
 before was terribly unintuitive and hidden, now it's more visible how to
 control the deformation, and b) now if you have more than one curve modifier,
 they can have their own settings, instead of being forced to use the object
 level data.
Especially for Compositing it was annoying that colors always got clipped
in the 0.0-1.0 range. For this reason, extrapolated Curves now is the
default. Old saved files still have horizontal extrapolation.

Set the option with 'Tools' menu (wrench icon). This is a setting per
curve, so you might need to set all 4 curves for an RGBA curves widget.
input nodes was 'passing on' the buffer (because it didn't operate on the
image). That's for example for Blur with size 0 or for Translate node.
This passed-on buffer then got freed inside the group...

Solution now is just a malloc. Better system should be devised, with
reference counting or so. Thanks Ivan Hoffmann for the sample file!
* This addresses the long command-line problem when building with SCons/MingW on windows through a dosbox (cmd.exe).

My test buildpath was: C:\Documents and Settings\nathan\My Documents\blender\build\win32-mingw
Should be rather long enough, don't you think?

/Nathan
- When in 2D image paint mode or mesh editmode, draw a shadow mesh
  to more clearly indicate the UV's are not editable.
- While in editmode the UV's displayed are now updated as the mesh is
  edited, whereas before it would draw the UV's of the mesh before
  entering editmode.
- Icon previews for Images were created always for old files, which made
  browsing (menus) incredible slow. Added a minor change in the flow, so
  icons only get created when the user invokes loading images.
  Andrea; you might check this, probably not al cases are covered yet?

- Compositor: the 'File Output' node now has a min/max frame for which it
  writes files

- Compositor: fixed a very bad bug (even in 2.42a release) that made the
  depsgraph for nodes not work... while editing, only the nodes that change
  should be recalculated, but accidentally all of them were done each time.
Embryon functionnality for snapping.

- Only snaps to grid on translations (grab)
- Transform constraints are supported but header display is wrong.
- Can be turned on/off in the Object/Mesh header menu under Transform Properties (tentative spot, will have to integrate better and in other object type menus too)
- Can be turned on/off during transform with ` (Back Quote, also tentative)

This is, of course, very much Work in Progress.

This implements part of the structural ideas for the transform cleanup I've been juggling around with.
Customizable Grid Subdivisions

This commit adds a numbut to the View Properties panel that lets you specify how the grid is subdivided.

This affects snapping in translations, obviously.

Default: 10 (behavior doesn't change)

That means people still stuck in feet and inches (shudders) can set it to 12 and have 1 unit = 1 foot.

That also means you can work in "heads" when doing body proportions or whatnot (don't think of it as being limite to "CAD" uses).
Missing include for ListBase. Wasn't a problem until someone try to include this without including ListBase (manually or through something else). Safe now.
Creates a 4x4 matrix from location, size and euler angles components.

Coded by Joshua Leung (aligorith) for one of his patches. Integrating right now because it's useful in and of itself.
Made nice crashes that way... but not in !@%@$ OSX because it seems to
clear memory unwanted. Solve dit with adding API call in MemArena to default
to callocs.

Also removed malloc() from MemArena, replaced with MEM_mallocN().
In some cases faces were skipped from rendering, when using multiple
RenderLayers. Was caused by a "don't render" flag hanging. Error was
introduced with the "All Z" RenderLayer option.
SB collision targets may be picked up from modifier stack
works fine with static targets having subsurf and/or array mofifiers
see-->
http://www.wund.homepage.t-online.de/hidden/Mstack.blendhttp://www.wund.homepage.t-online.de/hidden/Mstack_II.blend
however when calulating the SB object dynamics the vertices of the
'deform only' m-stack result are used
so SB <-> SB may look strange
subsuf modifier is applied to SB object after doing SB dynamics
(that is: colliding mesh is subsurfed, SB is not )
subsurfed SB cubes colliding
link --> http://www.wund.homepage.t-online.de/hidden/ColSelfMod.blend
or may give unwanted results
subsuf and array modifier is applied to SB object after doing SB dynamics
link --> http://www.wund.homepage.t-online.de/hidden/ColSelfMod_nobug.blend
last, modifiers that change vertex locations in time (like waves)
suffer from not beeing seen at needed time resolution
(SBs see colliders static in a frame)
well but that's beyond the limits of the current dep-graph use
and needs to be resolved on design level
anyhoo have fun
BM
* Add WITH_BF_YAFRAY, which per default is 'true', so no visible changes for developers (and users).

Set WITH_BF_YAFRAY to 'false', and you'll save some major compile time :) Also handy if you're strapped for memory and compilation fails on yafray compilation due
 to this.

- this commit also has a few whitespace changes and
- made BF_NO_ELBEEM a proper BoolOption. This will be renamed to WITH_BF_ELBEEM in the near future...
Alt-J behavior has been replaced by a port of the Tri2Quad python script
currently in CVS. This method has many advantages over the old behavior.
A simple illustration of how the new method is superior to the old can be
made by triangulating a suzzane and converting it back to quads.
http://www.umsl.edu/~gcbq44/t2q2a.jpghttp://www.umsl.edu/~gcbq44/t2q2b.jpg
The algorithm works by considering all possible triangle pairings and then
weighting them according to how appropriate it would be to join. These pairs
are then quick-sorted and those with the highest weighting factor are combined.
The function is quite fast even for dense meshes and usually involves no
noticeable wait-time for completion. For instance the following imported
model took less than 2 seconds to convert on my 1.3ghz PPC powerbook:
http://www.umsl.edu/~gcbq44/mimitri.jpghttp://www.umsl.edu/~gcbq44/mimiquad.jpg
It should be noted by the user that this method also discards face pairs
where the two triangles:
-do not share the same material
-do not share the same UV image (texface)
-do not share a compatible set of UV coordinates
-do not share a compatible set of vertex colors
-will form a concave quad or create a non-planar face
Additionally if the edge shared by the pair is marked 'sharp' the pair
will be discarded from the quicksort. In this way the user can gain great
control over the conversion process if they desire as this imported VRML
model of a sneaker illustrates:
http://www.umsl.edu/~gcbq44/t2qa.jpghttp://www.umsl.edu/~gcbq44/t2qb.jpg
For the future it would be nice if some of the options for the conversion
process, such as angle tolerance, could be made configurable in the UI.
However it is unclear at this time which options should be made configurable
and where to put them. Feedback on this is appreciated.
Special Thanks goes to Joe Eager for the two macros he contributed to this code
and to Campbell Barton for writing the script this was based on!
Duplicating a Library-linked Mesh with Library-linked texture Images forgot
to set the texture Image link flag to LIB_EXTERN (LIB_INDIRECT means the ID
is not saved in file).

Error was that a the duplicated Mesh lost texture.
http://www.blender3d.org/cms/Shadow_buffer__Halfway.786.0.html

Simply said: by using the average of the nearest and 2nd nearest Z value
in Shadowbuffers you can reduce bias errors very well.
For backwards compatibility it is a new buffer type though.
Full log:
http://www.blender3d.org/cms/Irregular_Shadow_Buffe.785.0.html

In short: this is a shadow buffer approach that always results in crispy
shadows, independent of lamp buffer size or zoom level. This shadow buffer
system also supports transparent shadow.

This is part of work on refreshing Shadow Buffers in Blender. You now can
choose of two types (Classical, Irregular). More types will follow. Also
quality issues for Classical shadow buffers are going to be reviewed,
especially to solve the lousy Biasing.

For the CVS log record; it is based on articles:
Gregory Johnson et al, University of Texas, Austin. (Regular grid method).
Timo Aila and Samuli Laine, Helsinki University of Technology. (BSP method).
nicer kinematics in self collision -> blending to complete inelastic impact
now does something close to real physics

first steps towards aerodynamics
anisotropic friction
springs 'see' their movement in media
--> see surrrounding  media does not move and/or reacts on wind
(*for now  needs to have a pseudo collider araound  -> that is: add a cube in the same layer
and make it a deflector  *)
- added green circle behind object node shared at verse server
 - it is easier to figure out, what is shared and what isn't shared

 - color is hard coded now, but Matt can improve it ;-)
* print (# servers) instead of icon row when there are servers in the list
* dark-green circle behind server icon in server list when connected
* orange when connecting
* added two files from verse-master
* server list is available in outliner (new mode "Verse Servers")
* verse sessions are now also in new mode "Verse Sessions" in outliner
* fixed drawing of verse sessions and their nodes
* in user preferences System & OpenGL master-server ip setting (default master.uni-verse.org)
* in File>Verse entry "Get Servers" to get server list or
* RMB on "Available Verse Servers" in outliner to "Refresh" server list

Enjoy :)
Third fix for this bug! In august I've added the function
Mat3ToCompatibleEul(), which ensures a proper euler value being derived
from a matrix, while inserting Ipo keys after a transform().
That also had to be done for camera fly mode.
This is a modified version of DeJaVu Sans, which is the same as the previous
Vera Sans, but with additional characters for languages (such as Czech) that
were missing from Vera. This version I'm committing has modifications to reduce
file size, cutting out useless stuff like ancient Greek characters.
also speed up for select group, only find group status for unselected objects.

Updated the select group menu in 3 places, the space bar menu was out missing some other group options also.
No other BPyModules do this and zero user lattices are kept so this check is not needed.

removed lattice.applyDeform(), this called object_apply_deform, which only gave a message to use modifiers.

changed the example in epydocs to apply the lattice using modifiers.
an error in Scene.c - scn.Layers disallowd all layer bits to be set.

made image_billboard.py rotate all images to be verticle for more efficient packing, added the option not to pack resulting images into 1.
uv_archimap still had python based line intersect

added plane2matrix function to BPyMathutils
added an optional arg to imageFromObjectsOrtho - camera_matrix
camera_matrix can be used to define a plane in 3d space where X and Y scale is used to set the width and height of the area to render.
scn.objects.new(None) - adds a new empty
 - new objects are selected by default now

further stripped down the vector struct, the wrapped state was being stored and 2 places.
just did a few tests, with the 'surprising' result that balls are not curves ..
and i don't want to be swamped by bug reports tellling me
'it does not collide as i whised it would'
only alow self collision for suited objects

feature request from hairdressers
self collision for curves
works amazingly well if you keep in mind there balls around vertices colliding
ironing out a few glitches related to goal pinning
volatile test blend ->
http://www.wund.homepage.t-online.de/hidden/sb_col_must.blend
+ adding a few alternative collision ball calculation algos
since i did not want to blow up (waste)  DNA space without need,
coded as -1.0 -0.1 -1.1 values in 'ball size' (look at tooltip popup)
added in place operations.
  Vector_iadd   vec1+=vec2
  Vector_isub   vec1-=vec2
  Vector_imul   vec1*=float or vec1*=mat
  Vector_idiv   vec1/=float

length is now writable vec.length= float
removed the need for casting python objects to Vectors pyobjects when performing vec/float arithmatic.
a PyObject for coercing has also been removed from the vector struct so a little less memory will be used also.


Benchmarked before and after this change
___________________________________
import Blender
v= Blender.Mathutils.Vector
m= Blender.Mathutils.Matrix

a= v(1,2,3)
b= v(3,2,1)
c= m()
t= Blender.sys.time()
for i in xrange(20000000):
        a*b
        a*10
        a/10
        a+b
        b-a
        a*c

print Blender.sys.time()-t
_______________________________________

Before 63.5sec
after 49.5

about 3 sec of that is looping
file was also happening on files made with current CVS (until next release).
Added a simple check to make it only happen on old files where there was no
radius before.
This patch adds the feature of IPO curve mirroring. It mirrors the selected keyframes in the active ipo curves over a user-nominated mirror-line.

Options are:
- Mirror over current frame
- Mirror over vertical axis (X = 0)
- Mirror over horizontal axis (Y = 0)

Functionality can be accessed from:
- Hotkey M in IPO editor
- Submenu in header of IPO editor
** This is a heavily modified version of the patch, but the idea is the same. **

This adds X and Y as hotkey for constraining IPO transforms (grab only) and also fixes the display to only show relevant information when constraining (grab and scale).
That is, a 3D curve now displays as ->->->-> instead of -|-|-|-|.

Comparing the two, I didn't find the arrow display any more confusing then the straight lines when dealing with loops and tilt variations. Sharp turns are more likely to display crossed lines though.

Others should feel free to disagree and make it better.
simple (naive) self collision
estimates a collision ball
using the spring lenght to attached neighbours
(idea stolen from old cloth modifier files, but i'm sure ZAZ and genscher won't mind)
-- usefull for untangeling static cloth like objects
-- may be used for cloth simulation with known limitations
like 'tunnel effect' if objects are moving too fast ...
demo -- volatile files
http://www.wund.homepage.t-online.de/hidden/sb_without_selfcol.avihttp://www.wund.homepage.t-online.de/hidden/sb_with_selfcoll.avi
have fun
BM
Some operations like edge loop deselect would cause selection history
to become invalid. Added a sanity check to countall() to try and catch
these when they happen.
The wait cursor was being called during editmode enter and exit for meshes.
This was a problem for several reasons. First of all, python modules like
Mesh now make use of editmode features. These methods that wrap editmode
tools may be called many times during the execution of a script
and lead to the wait cursor rapidly flickering on and off.

The other problem was that the wait cursor wasn't being called for editmode
enter and exit of all data types. This is unified now.

-New Arguments

enter_editmode() should be passed a nonzero integer or simply EM_WAITCURSOR
if the wait cursor is desired. Currently only the python API passes a '0'
to enter_editmode()

exit_editmode() has several options and they are passed in as the bitflags
EM_FREEDATA, EM_FREEUNDO and EM_WAITCURSOR. These flags are defined in
BDR_editobject.h.
countall() wasn't being called when scenes were being added/deleted.
This caused the info header to temporarily display incorrect information
about scene statistics.
Added Mesh .key .removeAllKeys() and .insertKey() for MDD support (was using NMesh just for keys before)
Since this is aparently an experemental feature in NMesh we may want to change this.
Gives local structure stability for though fabrics, thin steelplates ..
even suzanne gets pretty crash resistant that way.
If non zero it not only adds diagonals but all other "2edge-wide" springs
so it somehow replaces stiff quads for meshes too.
- A new Save image function, next to the existing Save As.
- Shortcut keys Alt+S, Alt+R, Alt+O and Alt+N for Save, Reload, Open
  and New image respectively, consistent with the text editor window.
- Hide Select and UVs menus when UV editing isn't active.
- Removed duplicate and unused code, also moved some functions.
BPyRender.imageFromObjectsOrtho() returns an image

Made all image bake scripts ask before overwriting a file. as well as displaying the newly created image once its rendered.
This never worked that well, so now after unwrapping, uv charts are
rotated to fit in their smallest enclosing rectangle. This should give
the expected behavior in the most common cases.
When using new Shadowbuffer option "Auto clip", the clipping planes could
become so narrow that sampling code - using ints - could result in
overflows (sign flip). This especially for small shadow buffers with high
bias values.

This fix adds an extra check in shadow sampling for such overflows.
This is another proportional edit falloff that slightly randomises the
influence. It's not strictly random, it's blended with linear falloff so that
it's a bit smoother. The nice thing is that it works with all transforms, axis
locking etc, including the special ones like to sphere, shrink/fatten/etc. It
can be used for all sorts of things like roughening surfaces. I most recently
used it to add a bit of randomness to the folds of some cloth. I
made a short demo video here: http://mke3.net/blender/etc/prop_random-h264.mov

Also included nicer icons for the falloff types.
with regards to the noise functions in yafray based on Ken Musgrave's
original code.
I had left the 'Copyright' notice in the comments, and according to
Cyril Brulebois this is a problem. In fact, from what I understand this
makes it even impossible to use or modify the code in other software.
But since it is not a verbatim copy of the code but rather based on Musgrave's
work, he suggested I change it to explicitely state that it is in fact
based on the code from the 'Texturing & Modeling' book.
And since the yafray code is in turn based on the blender code, I better
adapt the blender code too.

This reminded me that I also have forgotten to include the copyright notice
in the mersenne twister rng code I used for the Python Noise module.
This does clearly state to include the original notice with any resdistributed
code, in modified form or not. So I added that too.

I hope that solves the problems.
previous one was ok as a quick fix during orange and showed distortion obviously
but it was kind of extreme, and I'd rather not be blamed for causing blindness
or brain tumours because of it. This pattern is nicer, and still shows
distortion and its location on the map well.
falloff and spacing. Click the button labeled "P" next to the sliders.
Works best for opacity, other options can give poor quality strokes in
some cases. Also performance needs to be improved.

Remember, works only on X11 and Mac, no Windows support for tablets yet.
If you define multiple RenderLayers with different view-layers, these
view-layers are rendered entirely, not looking at the faces that are
invisible. This allows layered composite, but only when geometry does
not intersect or overlap partially.

This new Renderlayer option "All Z values" will fill in the Z of not
visible faces (in the Scene view-layers) as well, which then allows
masking out as if these faces were set to Material option "Env".

Here's an example composite to show the effect:

Two cubes, in view-layers 1 and 2, and rendered in 2 RenderLayers:
http://www.blender.org/bf/all_z0.jpg

Same scene, but with both RenderLayers set to "All Z values":
http://www.blender.org/bf/all_z.jpg
Added to existing scn.objects
scn.objects.active    (get/set the active object for the scene)

scn.objects.selected    - an iterator that only uses selected objects
scn.objects.context    - an iterator on objects in the user context (visible in the current 3d views layer and selected)
These are the same type as scn.objects but .add() .remove() .new() .active etc raise errors. so scn.objects.selected.add() will raise an error.

Made nested loops possible with scn.objects, metaball.elements and ob.modifiers, by initializing the iter value as NULL and creating copys of the pyobject when _getIter() is called if ->iter is not NULL.
This is how pythons xrange() works.
Previously had Vertex snapping in knife tool adjustable by the 'threshold'
value in the 'Mesh Tools' panel. This was actually a misunderstanding on
my part of a user request (oops). What was really needed was to make the
sensitivity of intersection code for vertex cutting adjustable. Vertex Snap
is now set at same tolerance as vertex selection.
feature. Old files that had "sticky" set would not show "sticky" under
the new system. Not that anyone ever actually used "sticky".

Also, these commits only add support for rotated external target objects,
not target bones inside the same armature.
making it much more useful. Requested and taunted for frequently by
Plumiferos folks. Click on "Use Rot" to take target object rotations
into account.

Good for using rotated empties, etc., as a sloped floor.
This made nested loops with the same python object mess up.
eg-
faces= me.faces
for f1 in faces:
  for f2 in faces:
    print f1.index,f2.index

This didnt work, fixed by initializing the iter value at -1, so any greater value will create a new BPyObject with its own iter value.
once iteration is finished, its set back to -1.

Also made face and edges iter value a char instead of an int to save some memory.
Cutting through vertices and vertex snap was only supported in
'knife exact' mode. Now works for 'Knife Midpoint' as well.
(Multicut and vertex cutting would require N-Gons)